
Auto Glass Repair
A removable rubber molding strip is a legitimate DIY replacement. An encapsulated or bonded molding is not, because separating it from the glass without removing the windshield risks chipping the glass or cracking surrounding paint. If you spot bonded trim, rust along the pinch weld, or a damaged urethane bead, stop and call a professional auto glass shop before you touch a trim tool.
TL;DR:
- Removable moldings can typically be replaced DIY with hand tools, while encapsulated or bonded trim requires professional removal to prevent damage.
- Rust along the pinch weld or a cracked urethane bead indicates the need for professional inspection and possible repair instead of a simple molding replacement.
- Using the wrong adhesive or reusing old clips is a common mistake that can cause leaks or trim failure within weeks, so surface prep and new parts are essential.
- DIY replacement parts generally cost between $20 and $150, but complex jobs with ADAS calibration can reach over $1,000 at a shop.
- Encapsulated trim and rusted pinch welds are signs that professional replacement is necessary to ensure safety and avoid future damage or leaks.
Table of Contents
- How Do You Identify the Right Windshield Molding Before You Buy Parts?
- What Are the Steps to Replace a Removable Windshield Molding?
- When Should You Hire a Professional Instead of DIYing It?
- What Mistakes Ruin a DIY Windshield Molding Job?
- Why We See So Many Molding Repairs Go Wrong the Second Time
- Ready to Skip the Second Repair? Here’s How to Get It Done Right
- Where This Information Comes From
- Sources
- FAQ
How Do You Identify the Right Windshield Molding Before You Buy Parts?
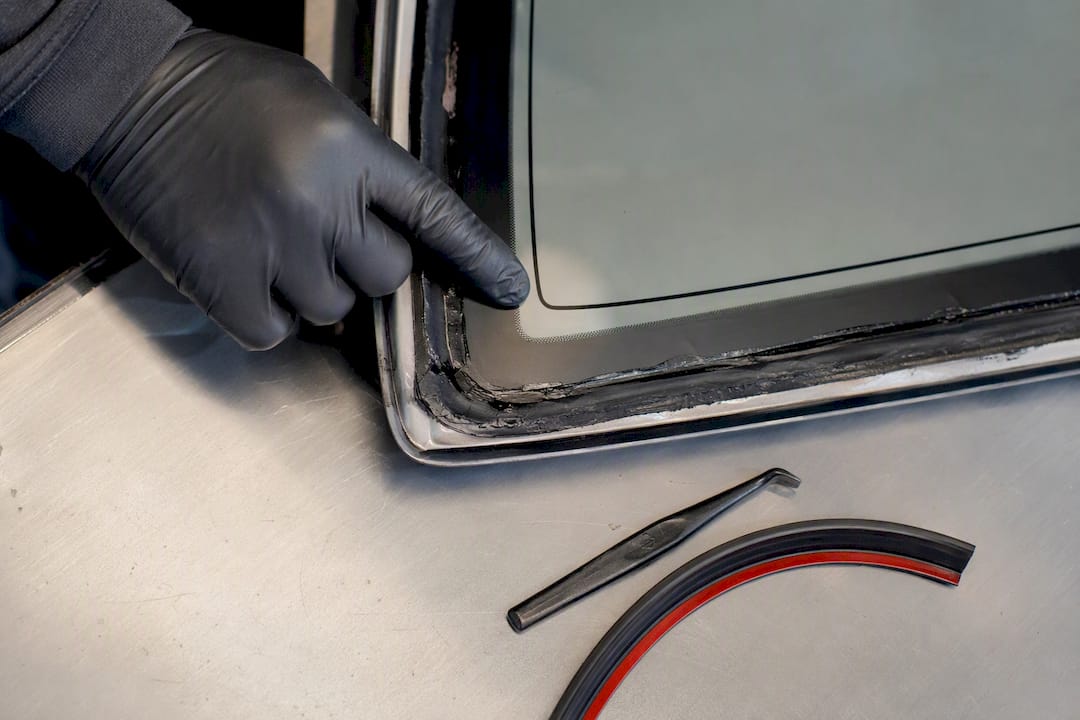
Before you order anything, figure out which of the two molding types your car actually has. Removable moldings sit in a channel and pop off with hand pressure or a trim tool. Encapsulated moldings are molded directly onto the glass edge during manufacturing, so the seal lip runs flush with the paint line and there’s no visible gap to pry into.
Run your fingernail along the edge where the trim meets the glass. If you feel a lip you can lift, you likely have a removable strip. If the rubber is flush and continuous with no seam, you’re looking at encapsulated trim, and that’s a job for windshield replacement services, not a Saturday project. Bonded moldings are typically formed during windshield manufacture, and removing them separately almost always damages the glass or the paint around it.
Most rubber moldings hold up for three to five years before they crack, peel, or start whistling at highway speed. If yours is past that window and showing daylight through gaps, replacement beats patching every time.
Parts to have on hand:
- OE-specific molding or a manufacturer refurbishment kit for an exact fit
- Universal molding rolls in the correct width if your vehicle doesn’t have a dedicated OE part
- New retaining clips and fasteners (never reuse old, brittle ones)
- Cowl panel clips if your cowl needs to come off for access
- Automotive-grade urethane adhesive or 3M automotive double-sided tape, matched to your molding type
Universal moldings come in a range of widths, commonly 7mm, 9.5mm, 16mm, 19mm, and 25mm, plus solid or foam-backed constructions, and they’re sold in long rolls that need trimming to length. Retailers like Amazon carry thousands of SKUs spanning OE-exact parts, refurbished originals, and generic trim, so measure twice before ordering.
Tools you’ll want:
- Plastic trim tools and nylon wedge tools (metal screwdrivers gouge paint)
- A wire brush for old adhesive residue
- Isopropyl alcohol and lint-free rags for surface prep
- Nitrile gloves and safety glasses
- A heat gun on low setting for brittle, sun-baked trim
- An adhesive applicator or caulking gun for urethane
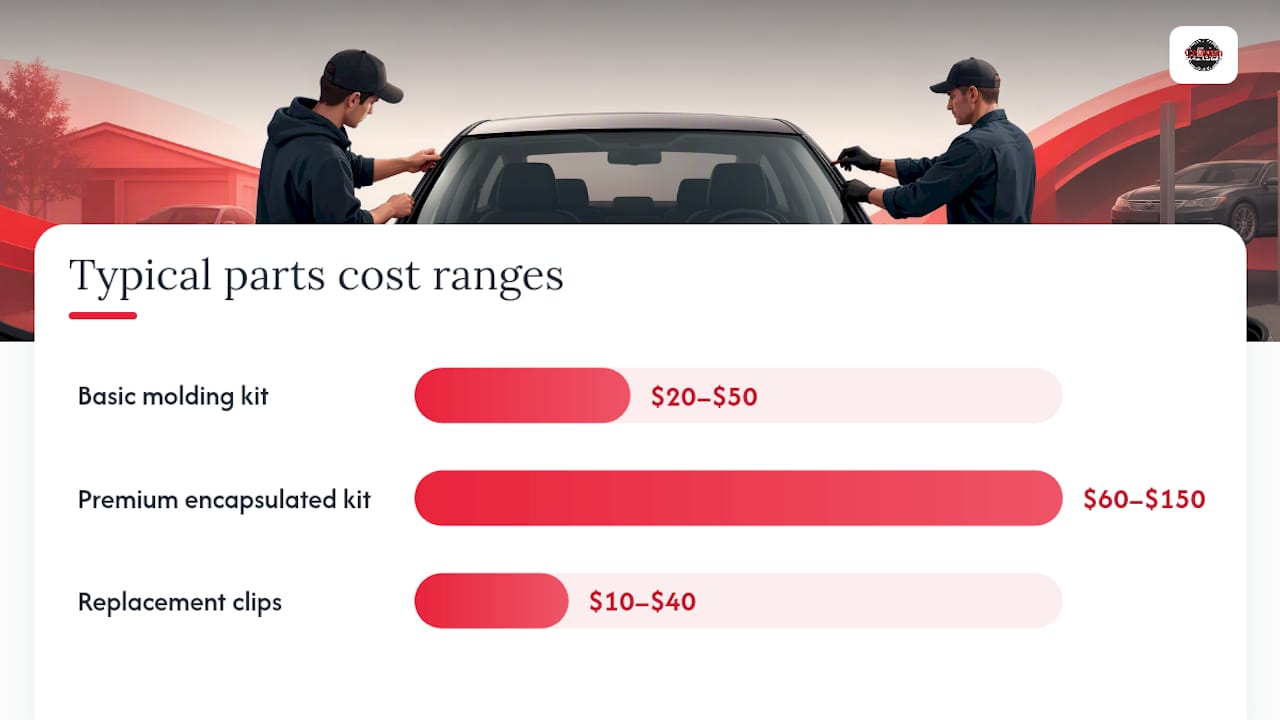
Budget for parts realistically. Basic molding kits run roughly $20 to $50, premium encapsulated-style moldings run $60 to $150, and replacement clips run $10 to $40 depending on your vehicle’s trim level.
What Are the Steps to Replace a Removable Windshield Molding?
Removable molding replacement is one of the more forgiving auto trim jobs, but sequence matters. Skip a step and you’ll either scratch paint or end up with a leak six months later.
-
Set up your workspace. Park on level ground in shade if possible, since direct sun softens adhesive and makes trim harder to control. Lay painter’s tape along the paint edge next to the molding and drape a towel over the cowl to catch dropped clips.
-
Secure loose trim first. If the old molding is already flapping, tape it down temporarily so it doesn’t flick paint chips or scratch the glass while you gather tools.
-
Start removal at a corner. Corners have the least adhesive tension. Slide a plastic trim tool under the edge and work it slowly along the length, popping clips as you go rather than yanking the whole strip at once.
-
Watch for clips and cowl fasteners. Many moldings anchor through the cowl panel. If yours does, remove the cowl clips carefully. Note any that are broken, rusted, or brittle. They almost never survive reinstallation, so plan to replace them.
-
Check for rust as you go. If the pinch weld underneath shows rust bubbling through paint, stop the DIY project here. Rust under the urethane bead is a structural issue, not a trim issue.
-
Clean the channel thoroughly. Scrape away old foam and adhesive residue with a plastic scraper, then wipe the surface with isopropyl alcohol. Inspect the urethane bead sealing the glass to the body. Any cracking, gapping, or separation means you need a professional resealing, not just a new molding.
-
Dry-fit before committing. Lay the new molding in place without adhesive first. Confirm it aligns with drainage channels and mounting holes, and trim excess length from a rear or bottom corner where cuts are less visible.
-
Install from one corner around. Starting where you began removal, press the molding into its channel or apply your urethane or 3M tape per the manufacturer’s instructions, working steadily so you don’t trap air bubbles or misalign the strip.
-
Let the adhesive cure. Cure times vary by product, so check the label. Avoid car washes or highway driving until the adhesive has fully set.
-
Run a water test. Once cured, run a garden hose over the windshield edge for several minutes and check the interior headliner and A pillars for moisture.
-
Take a short low-speed drive. Listen for wind noise or rattling that signals a loose section or a clip that didn’t seat.
Pro Tip: Keep the old molding piece next to the new one while you work. Side-by-side comparison catches length and profile mismatches before you’ve committed adhesive, which saves you a second trip to the parts counter.
If you notice water intrusion or noise after the test drive, don’t just add more sealant blindly. Re-seat the affected section first, since a partially popped clip is the most common cause.
When Should You Hire a Professional Instead of DIYing It?
Encapsulated molding is the clearest line in the sand. Because it’s formed onto the glass during manufacturing, separating it without removing the windshield typically chips the glass or cracks adjacent paint. At that point you’re no longer replacing a $30 strip, you’re paying for a full windshield.
Beyond encapsulated trim, several warning signs mean the job belongs in a shop bay:
- Visible rust along the pinch weld or body flange
- A cracked, gapped, or separated urethane bead
- Repeated leaks after a DIY reinstall
- Trim that’s melted, brittle, or crumbling from heat and UV exposure
- Damage to the cowl panel or its mounting points
Cost snapshot: DIY parts alone typically land between $20 and $150 depending on molding type, plus clips. Professional replacement changes the math because labor, adhesive, and calibration get bundled together. Total shop quotes for windshield work commonly range from a few hundred dollars on the low end to well over $1,000 on the high end, with the spread driven largely by whether ADAS calibration is required.
That calibration step matters more than most drivers expect. Vehicles with forward-facing cameras or sensors mounted near the windshield often need recalibration after the glass is replaced, and skipping it can leave safety systems like automatic braking misaligned. Calibration is frequently billed separately from glass and labor, which is a major reason two shop quotes for the “same job” can differ by hundreds of dollars.
Insurance coverage splits along a similar line. When molding replacement happens as part of a covered windshield replacement claim, most policies bundle it in without a separate line item. A stand-alone molding swap for wear and tear, with no glass damage involved, is far less likely to be covered and usually comes out of pocket.
What Mistakes Ruin a DIY Windshield Molding Job?
Most failed DIY molding jobs trace back to the same handful of errors, and every one of them is avoidable.
- Using the wrong adhesive. Silicone caulk and super glue seem convenient, but neither holds up to temperature cycling or UV exposure the way automotive urethane or 3M automotive tape does, and both contaminate the surface for any future proper repair.
- Skipping surface prep. Old foam residue and adhesive left behind stop new adhesive from bonding fully. A thorough alcohol wipe and scrape isn’t optional, it’s the difference between a repair that lasts years and one that pops loose in a month.
- Reusing broken or stretched clips. Clips are cheap, usually $10 to $40 for a full set. Reusing cracked ones is the single most common reason moldings work loose within weeks.
- Rushing the cure time. Driving on the highway or hitting a car wash before adhesive sets undoes hours of careful work.
- Ignoring rust under cosmetic trim. A brand-new molding over a rusting pinch weld is a temporary fix on top of a structural problem.
If you get a leak after installation, re-seat the molding at the suspect section before reaching for more sealant. A dab of sealant at a corner can buy time, but if you can see exposed urethane or bare metal, that’s your signal to stop DIY troubleshooting and call a shop.
Pro Tip: If a molding “looks fine” but the car has ever had hail damage or a prior windshield replacement, check the urethane bead closely before you buy new trim. Cosmetic molding often gets swapped to hide a bead that was never properly reset the first time.
Why We See So Many Molding Repairs Go Wrong the Second Time
We’ve been replacing auto glass in Portland since 2008, and the pattern with molding repairs is consistent: the second attempt costs more than the first would have if it had been done right. We regularly see cars come in with reused clips rattling loose within weeks, or encapsulated trim that a well-meaning owner tried to pry off, only to chip the glass edge and need a full replacement anyway.
Reusing old moldings or clips to save fifty dollars on a quote is a common shortcut, and it’s almost always the reason a car comes back for a leak repair a few months later. Every windshield we install gets new moldings and clips as standard practice, backed by our lifetime no-leak guarantee. When a vehicle needs ADAS calibration after the glass moves, we handle that in-house rather than sending it to a third party, and we offer same-day mobile service with direct insurance billing so a repair doesn’t turn into a week of phone calls.
— Collision Auto Glass & Calibration
Ready to Skip the Second Repair? Here’s How to Get It Done Right
If your molding turns out to be encapsulated, your pinch weld shows rust, or your vehicle needs ADAS calibration after glass work, the safest move is booking a professional instead of pushing a DIY fix past its limits. Some professional auto glass services offer same-day mobile installation and lifetime no-leak guarantees to help ensure durable repairs.
Fleet managers and RV owners face the same encapsulated-trim and calibration questions as passenger car owners, just with higher stakes per vehicle. Some services also handle direct insurance billing to simplify the claims process. If you’re staring at a windshield with bonded trim, visible rust, or a car that needs its cameras recalibrated after glass movement, get a windshield replacement cost estimate or schedule an appointment before a small trim problem turns into a full glass replacement.
Where This Information Comes From
The cost figures and identification guidance in this guide draw from the Auto Glass Estimator’s cost breakdown, which documents parts pricing and shop quote variation, and CarParts.com’s guide to windshield molding, which explains the removable versus bonded distinction and typical lifespan. Universal molding specifications came from South Mountain Supply’s molding catalog, and parts availability data came from Amazon’s windshield molding listings.
For readers weighing whether their vehicle needs sensor recalibration after any glass work, Collision Auto Glass & Calibration’s page on ADAS recalibration after windshield replacement covers the specific triggers in more depth.
Sources
- Windshield Replacement Cost Breakdown: Why Quotes Vary by $800 – Auto Glass Estimator™
- Carparts
- Universal Auto Glass Moldings for Windshield Installation
- Windshield Molding – Amazon
FAQ
How much does it cost to replace windshield molding?
Basic DIY molding kits run about $20 to $50, premium encapsulated-style moldings run $60 to $150, and clips cost $10 to $40. Full shop quotes that include labor and adhesive typically range from a few hundred dollars up to $1,000 or more when ADAS calibration is involved.
Can you replace windshield molding yourself?
Yes, if it’s a removable strip that lifts off with a trim tool. Encapsulated or bonded molding is fused to the glass during manufacturing and usually requires professional windshield removal to replace safely.
Can I drive without windshield molding?
You can drive short distances, but missing molding exposes the urethane bead to UV damage and water intrusion, which accelerates leaks and can compromise the seal over time. Replace it as soon as possible rather than treating it as cosmetic.
How much does it cost to replace weather stripping on a windshield?
Weather stripping and molding replacement costs overlap closely: expect $20 to $50 for basic strips, up to $150 for premium encapsulated versions, plus $10 to $40 for clips if you’re doing it yourself. Professional installation adds labor costs on top of those part prices.
Recommended
Share
Recent Posts

October 15, 2026
Auto Glass Claims: Choose a U.S. Shop Before ADAS Billing Surprises
See how U.S. drivers can choose an auto glass shop for an insurance claim, confirm ADAS calibration, protect their rights, and prevent billing...
October 14, 2026
Fleet Windshield Maintenance: A 20 Minute Repair Can Prevent Days Down
Catch chips early, log the VIN and photos, and require part number and ADAS calibration records to keep fleet vehicles moving and avoid...
October 13, 2026
Calibration After Collision Repair: Ask for Scans Before You Drive
Learn when collision repairs require ADAS calibration, how shops verify the work, and which scan records and paperwork to request before driving....