Auto Glass Repair
Yes, Subaru EyeSight recalibration is required any time the windshield is removed or replaced, the stereo camera is removed or reinstalled, or the vehicle undergoes a front-end collision, wheel alignment, or suspension repair. It must be performed by a qualified technician using Subaru-approved tools and software, not a smartphone app or a homemade target board. This isn’t a courtesy step your glass shop offers to upsell you. It’s how the camera behind your windshield relearns exactly where “straight ahead” is.
The most common triggers for mandatory recalibration include:
- Windshield removal or replacement (even with the same glass)
- Camera removal or installation, or roof/pillar repairs near the camera mount
- Front-end collision, even a low-speed one
- Wheel alignment or suspension/steering component replacement
- Certain battery disconnects or software updates that clear EyeSight memory
If your dash shows an EyeSight warning message right now, don’t treat the car as road-normal; check your dashboard for common warning signs explained in the essential warning lights and indicators guide. Drive cautiously, avoid relying on adaptive cruise or lane-keeping assist, and get the vehicle scheduled for calibration before you lean on those features again. Keep the paperwork from that appointment. You’ll want it if a warranty question or insurance claim ever comes up.
Key Takeaways
Subaru EyeSight recalibration is mandatory after windshield replacement, camera removal, collisions, or suspension work, and only a technician with Subaru-approved tools can perform it correctly.
| Point | Details |
|---|---|
| Recalibration is non-negotiable | Windshield removal, camera work, collisions, and suspension repairs all require professional recalibration, not a reset. |
| Reset and recalibration differ | Clearing memory fixes temporary faults; only physical aiming corrects a misaligned stereo camera. |
| Static and dynamic both matter | A calibration that skips the road-test phase can leave faults stored even after static aiming looks complete. |
| Documentation protects you | Get a line-item estimate and written calibration confirmation for warranty and insurance purposes. |
| Choose a shop with in-house capability | Collision Auto Glass & Calibration performs SSM-based static and dynamic calibration in-house with a lifetime no-leak guarantee. |
Table of Contents
- How Subaru EyeSight Works and Why Alignment Matters
- When Does Subaru EyeSight Need Recalibration?
- What Does the EyeSight Recalibration Process Actually Involve?
- What Happens If You Skip EyeSight Recalibration?
- How Much Does EyeSight Recalibration Cost?
- How Do You Choose a Qualified EyeSight Calibration Provider?
- How Can Owners Help Protect EyeSight Accuracy?
- What Does a Reputable Shop’s Calibration Workflow Look Like?
- Get Your Subaru EyeSight Properly Calibrated in Portland
- Sources
- FAQ
How Subaru EyeSight Works and Why Alignment Matters
Subaru EyeSight relies on a stereo camera assembly mounted behind the windshield, tucked near the rearview mirror. It uses two lenses set a fixed distance apart to triangulate the position, distance, and closing speed of objects ahead, the same basic principle your own two eyes use to judge depth. That triangulation feeds adaptive cruise control, lane departure warnings, and pre-collision braking. Move that camera even a few millimeters off its intended axis, and every calculation downstream inherits the error.
That’s why a “reset” and a “recalibration” are not interchangeable, despite how often shops and owners use the words loosely. Clearing the EyeSight memory wipes stored fault codes and can bring the system back online after something like a low battery event, but experts distinguish clearing memory from physically aiming the camera, and a reset does nothing to correct a camera that’s now aimed two degrees off center after a windshield swap.
Physical recalibration means re-establishing three reference points: the camera’s own optical axis, the vehicle’s true centerline, and a calibration target placed at a documented, precise distance and height in front of the car. A technician measures from the wheel centers or another fixed reference to find centerline, marks the floor, and positions the target so the camera can relearn where zero degrees actually sits. Get that setup wrong by an inch and the whole calibration is worthless, even if the scan tool reports success.
During a proper service visit, you should see or hear about a few specific tools and references:
- Subaru Select Monitor (SSM) or an equivalent factory-level scan tool that communicates directly with the EyeSight control module
- An OEM calibration target or an approved ADAS target rig, not a printed sheet taped to a stand
- The Subaru service manual procedure and any relevant Technical Service Bulletin (TSB) for your specific model year
- Documentation confirming the camera passed its post-calibration data check
Subaru’s own EyeSight information points owners toward professional service for exactly this reason: the system’s accuracy depends on procedures most driveways and garages simply aren’t equipped to run.
When Does Subaru EyeSight Need Recalibration?
Some triggers leave zero room for judgment calls. Others are commonly required but occasionally get skipped by shops cutting corners, which is exactly why you need to know the difference.
Always required, no exceptions:
- Windshield removal or replacement
- Stereo camera removal or installation
- Repairs to the roof structure or A-pillar area that affect the camera’s mount point
I-CAR’s repair procedure guidance confirms these as strict recalibration triggers, and it adds a detail many owners miss: recalibration is required after minor collisions that could displace the stereo camera axis, even when no warning light appears on the dashboard. That’s a meaningfully conservative standard. Subaru isn’t saying “wait for the warning light.” It’s saying the axis can shift invisibly, and you should assume it did.
Commonly required, situation-dependent:
- Front-end collision, even one that looks cosmetic
- Suspension or steering component replacement
- Wheel alignment
- Battery disconnects or low-voltage events that trigger diagnostic trouble codes
That last one connects directly to a documented Subaru diagnostic path. Service bulletin coverage of DTC B281C, “Incompatible With EyeSight (EPS)”, walks technicians through checking EyeSight ECU voltage, clearing EyeSight memory with the Subaru Select Monitor, and rechecking battery voltage. It’s a good real-world illustration of why a scan tool step and a physical aiming step are two different jobs that sometimes both apply.
Why the conservative approach? A stereo camera’s whole job depends on two lenses staying in a fixed, known relationship to each other and to the road ahead. A fender-bender that barely dents a bumper can still transmit enough shock through the body structure to nudge that camera housing. Subaru’s guidance treats “might have moved” the same as “definitely moved,” because the cost of a missed detection event is far higher than the cost of an unnecessary calibration check.
After any repair that touches your windshield, front-end, or suspension, run through this checklist:
- Check for EyeSight warning messages or a lit indicator on the dash
- Ask the shop directly whether calibration was performed and request the documentation
- Confirm whether OEM glass and OEM-quality parts were used, since aftermarket glass with the wrong optical properties can complicate calibration accuracy
- Verify the invoice lists a specific calibration line item, not a vague “system check”
If any of those come back unclear, don’t assume everything’s fine just because the car drives normally. EyeSight faults don’t always announce themselves with a dashboard light the same day.
What Does the EyeSight Recalibration Process Actually Involve?
Every calibration job runs on the same core equipment list, whether it happens at a dealership or a certified independent shop. Before you approve an invoice, it’s worth knowing what should be sitting in that service bay.
Required equipment:
- Subaru Select Monitor (SSM) or an equivalent factory-level scan tool
- OEM static calibration targets, or an approved ADAS target rig with laser-guided positioning
- A plumb bob, string line, and measuring tape, or a laser-based fixture that accomplishes the same alignment task
- A level, unobstructed floor space in front of the vehicle with enough clearance to place the target at the correct distance
The workflow itself follows a fairly consistent sequence, and Alldata’s ADAS repair guidance for windshield replacement confirms this is a controlled, multi-step process rather than a five-minute software toggle:
- Vehicle prep. Tire pressures get set to spec, the fuel tank is filled or accounted for, extra cargo is removed, and the vehicle is leveled. Skip this step and every subsequent measurement is built on a shaky foundation, since ride height and tire pressure directly affect camera aim.
- Centerline measurement. The technician finds the vehicle’s true centerline, typically measuring from fixed reference points like wheel hubs, and marks the floor.
- Target placement. The OEM calibration target goes at a documented distance and height specific to the vehicle’s model and trim.
- Scan tool connection. The SSM or equivalent tool connects to the EyeSight module and initiates the targeting routine.
- Static aiming. With the vehicle stationary, the camera learns its reference point against the target.
- Dynamic validation. A road test follows, during which the scan tool monitors live EyeSight data to confirm the system reads distance and lane position correctly under real driving conditions.
That six-step split explains why so many jobs need both a static and a dynamic phase. Static calibration sets the baseline geometry, the camera’s understanding of straight-ahead relative to the car. Dynamic calibration then fine-tunes that baseline against the unpredictable variables of an actual road: pavement texture, ambient light, and small vibrations a stationary target can’t replicate. Industry technicians recommend finishing both stages under scan-tool monitoring, because stopping after static alone can leave faults stored and warning lights illuminated even when the car seems to drive fine.
Tolerances here are tighter than most owners assume. Subaru’s static calibration specs often call for accuracy within a few millimeters, which is exactly why many shops have moved from string-and-tape setups to laser-guided ADAS rigs that can hit those tolerances faster and more consistently.
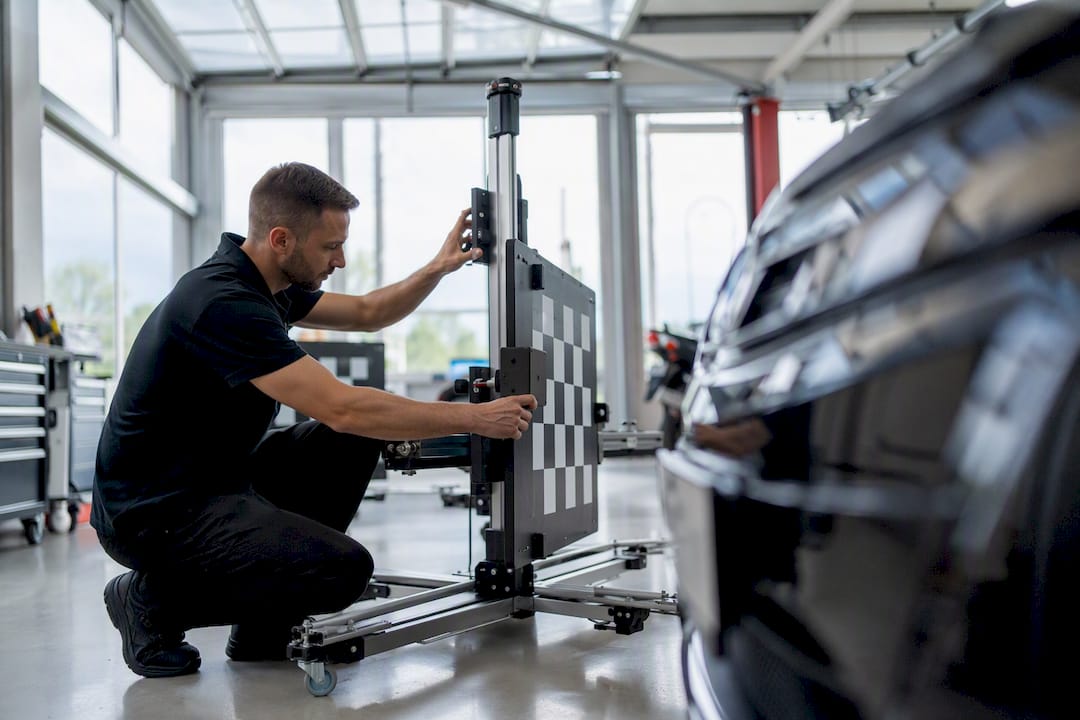
Pro Tip: Ask your shop directly whether they remove the EyeSight camera assembly before replacing the windshield, per Subaru’s own procedure. Camera removal itself triggers mandatory targeting, so a shop that skips the removal step to save time may also be skipping the calibration your car actually needs.
As for timing: static calibration alone often runs somewhere in the range of a half hour to an hour once the vehicle is properly prepped. Add a dynamic road test and documentation, and a full EyeSight calibration commonly extends the total windshield job by an additional hour or more. Shops that rush this or bundle it invisibly into “installation time” are worth a second question before you sign off.
What Happens If You Skip EyeSight Recalibration?
Driving on an uncalibrated EyeSight system means driving with a false sense of security. The camera might still display data on your dash. It might still “work” in the sense that a light doesn’t come on. But the numbers behind that display could be wrong.
The safety risks are the most serious consequence. An uncalibrated system can deliver false or delayed alerts from lane-keeping assist and adaptive cruise control, or fail to trigger pre-collision braking when it should. You’re not losing a convenience feature. You’re losing the split-second judgment call that feature exists to make for you.
On the functional side, expect one or more of these outcomes:
- Persistent EyeSight warning messages on the instrument cluster
- Automatic deactivation of adaptive cruise, lane-keep assist, or pre-collision braking
- Stored diagnostic trouble codes, including incompatibility codes tied to the EyeSight module
A camera that reports “calibration complete” without a documented dynamic road test isn’t actually finished. Faults can remain stored, and warning lights can resurface days later, even when the static phase looked clean on the shop floor.
The paperwork consequences matter just as much as the mechanical ones. If an ADAS-related failure gets traced back to a calibration that skipped OEM procedures, that gap can complicate a warranty claim. Insurers increasingly expect documented recalibration as part of any accepted glass claim, which means skipping the step, or failing to get it in writing, can leave you exposed on both fronts at once.
If you see an EyeSight warning light right now: don’t ignore it, don’t lean on adaptive cruise or lane-keep assist until it’s resolved, and get the vehicle to a shop that can run the full scan-tool diagnostic, not just clear the light and send you on your way.
How Much Does EyeSight Recalibration Cost?
Recalibration pricing varies with how much work the job actually requires. A static-only calibration on a straightforward sedan costs less than a job needing both static and dynamic phases, and pricing shifts further based on vehicle model and year, regional labor rates, and whether the camera had to be removed and reinstalled as part of a windshield job. Owners researching ADAS calibration costs should expect a range rather than a flat number, since no two vehicles arrive in identical condition.
Insurance frequently covers calibration when it’s performed as part of a covered windshield replacement claim, particularly when the glass shop bills the insurer directly and itemizes calibration as its own line rather than folding it into “installation.” That itemization matters more than owners realize. An estimate that lumps calibration into a vague total makes it harder to prove the work happened at all if a dispute comes up later.
Before you approve any windshield or ADAS-related repair, ask for:
- A line-item estimate that separates calibration from glass installation
- Written confirmation of whether static, dynamic, or both calibrations are included
- Proof that OEM-approved tools and procedures were used, which protects both your warranty and your next insurance claim
That documentation costs you nothing to request and can save real money if a dispute ever surfaces down the line.
How Do You Choose a Qualified EyeSight Calibration Provider?
Not every shop that replaces windshields is equipped to calibrate what sits behind them. Some outsource calibration to a third party. Some skip it and hope the customer doesn’t ask. A few genuinely have the tools, the training, and the documented process to do it right the first time. Your job is to find out which one you’re dealing with before the work starts, not after.
Ask these questions directly before booking:
- Do you use the Subaru Select Monitor (SSM) or an equivalent factory-level scan tool?
- Do you perform static targeting with OEM or approved calibration targets, not printed sheets or homemade boards?
- Do you remove the EyeSight camera before windshield replacement, following Subaru’s documented procedure?
- Can you provide written documentation of the calibration, including the scan tool’s data readout confirming success?
Credentials worth asking about include OEM-specific training, ASE master technician certification, and documented ADAS calibration tool certifications tied to a specific rig or platform. A shop that can name its equipment and walk you through its process without hesitation is generally the one that’s actually doing the work correctly.
Watch for these red flags:
- Reliance on homemade or printed paper targets instead of an approved calibration rig
- Refusal or reluctance to hand over calibration documentation
- No willingness to show a scan tool actively checking EyeSight data before and after the job
- Any suggestion that a windshield can be installed without touching or reinstalling the camera per Subaru’s procedure
As for dealership versus certified independent shop: dealerships carry the advantage of direct manufacturer training and the newest software updates, but a certified independent auto glass shop with proper in-house ADAS calibration equipment can often deliver the same SSM-based static and dynamic calibration with faster turnaround and more flexible scheduling. What matters isn’t the sign on the building. It’s whether the shop can show you the tools and the paperwork.
How Can Owners Help Protect EyeSight Accuracy?
You can’t calibrate your own EyeSight system, but a few habits reduce the odds of running into trouble down the line and make any future calibration go smoother.
Keep the area of windshield directly around the camera clean and free of stickers, dashboard clutter, or reflective objects nearby, since anything that partially obstructs the camera’s view can interfere with its readings. Check tire pressures regularly and keep an eye on ride height. Both affect the geometry a calibration technician relies on, so a car riding low on underinflated tires can throw off future targeting even without any collision involved.
When repair work is unavoidable, confirm ahead of time that OEM glass will be used, ask that the camera be removed and reinstalled per Subaru’s documented guidance, and request written or emailed confirmation once calibration is complete rather than a verbal “you’re all set.”
Pro Tip: Request the actual EyeSight data list readout from the scan tool, not just a verbal confirmation. A shop should be able to show you that the system passed its checks, and any warning light should only be cleared after that data confirms calibration succeeded, not before.
What Does a Reputable Shop’s Calibration Workflow Look Like?
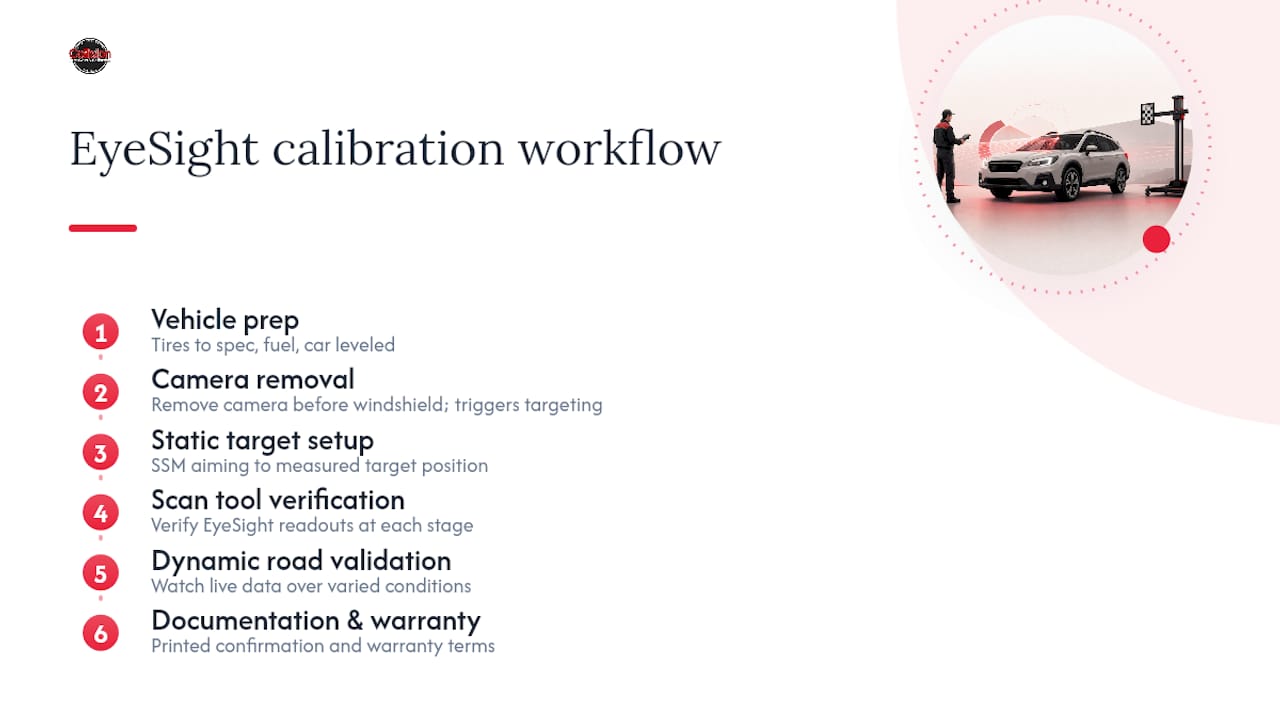
A shop that takes EyeSight seriously follows a workflow that rarely varies by vehicle, only by model-specific measurements. Vehicle prep comes first: tires to spec, fuel level accounted for, the car leveled on flat ground. If the repair calls for it, the camera assembly comes out before the windshield does, exactly as Subaru’s procedure specifies, since removing the camera itself triggers a mandatory targeting sequence afterward.
From there, static target setup and SSM-based aiming establish the camera’s baseline against a precisely measured target position. A scan tool verifies the EyeSight data readout at each stage rather than assuming success. Dynamic road validation follows, with the technician watching live data as the vehicle moves through varied lighting and road conditions. The job closes with documentation: a written or printed confirmation of calibration completion, along with any warranty terms tied to the work performed.
Collision Auto Glass & Calibration builds its process around that same sequence, backed by same-day mobile installation within the Portland area, in-house ADAS calibration capability rather than outsourcing to a third party, a lifetime no-leak guarantee on installations, and direct insurance billing that keeps paperwork off the customer’s plate. Technicians work from documented, model-specific procedures rather than generic shortcuts, and every calibration comes with a data readout the owner can actually see.
Why Following Subaru’s Exact Procedure Isn’t Optional
The biggest misconception we run into is the assumption that clearing a warning light means the problem’s solved. It rarely does. A reset and a physical recalibration accomplish two entirely different things, and skipping the second one leaves a car that looks fine on the surface with a camera that’s still misaligned underneath. Since 2008, we’ve built this business around doing that second step correctly every time, with in-house calibration equipment and a lifetime no-leak guarantee that reflects how much we stand behind the work. DIY calibration attempts and unauthorized tools consistently create the same pattern: temporary fixes that mask a real alignment problem until it matters most, usually at the worst possible moment on the road.
Get Your Subaru EyeSight Properly Calibrated in Portland
If your Subaru needs a windshield replacement, camera work, or a post-collision check, Collision Auto Glass & Calibration handles the glass and the calibration under one roof, so you’re not chasing down a second appointment at a dealership weeks later. That in-house setup means the technician who installs your glass is the same one running the SSM-based targeting routine right after, with no gap where your car sits undriveable and uncalibrated between two shops.
Same-day windshield replacement comes standard, along with free mobile installation across the Portland area, direct insurance billing, and a lifetime no-leak guarantee on every installation. When you book, ask specifically for SSM-based EyeSight calibration with both static and dynamic phases, camera removal if your model requires it, and written confirmation of the completed calibration for your records.
Request a quote for your auto glass repair today, and mention this article when you call for priority scheduling on your calibration appointment.
Sources
- Recalibration requirements for EyeSight (I-CAR RTS)
- Service manual correction / DTC B281C — incompatible with EyeSight (EPS)
- Subaru EyeSight — official Subaru information
FAQ
Can You Recalibrate Subaru EyeSight Yourself?
No. Subaru EyeSight calibration requires proprietary Subaru software, factory-approved scan tools, and precision measurement equipment that DIY methods and smartphone apps can’t replicate, and attempting it yourself risks deactivating safety features or voiding your warranty.
Does Subaru EyeSight Need to Be Calibrated After Every Windshield Replacement?
Yes, windshield removal or replacement is one of the strict, no-exceptions triggers for recalibration, since the camera assembly must come out and go back in as part of the job.
Can an Auto Glass Shop Recalibrate Subaru EyeSight?
Yes, as long as the shop has in-house ADAS calibration capability with Subaru Select Monitor access, OEM or approved calibration targets, and the ability to run both static and dynamic calibration phases. Collision Auto Glass & Calibration performs this work in-house rather than outsourcing it.
What Warning Signs Mean EyeSight Needs Recalibration?
Persistent EyeSight messages on the dashboard, sudden deactivation of adaptive cruise control or lane-keep assist, and stored diagnostic trouble codes like B281C all signal that the system needs professional attention before those features are used again.
Is There a Class Action Lawsuit Related to Subaru EyeSight?
Reports of EyeSight-related legal claims exist, but specific case details and outcomes vary and aren’t something this guide can verify with certainty. Owners with safety concerns about their specific vehicle should consult Subaru directly or a qualified attorney rather than rely on general online claims.
Recommended
- Blind Spot Calibration: A Complete Guide for Drivers
- Radar Sensor Calibration: What Vehicle Owners Must Know
- Windshield Camera Calibration: Portland’s 2025 Guide
- What Happens If ADAS Is Not Calibrated? – Collision Auto Glass & Calibration
🎧 Listen to This Article
Share
Recent Posts
October 16, 2026
Fleet Auto Glass Programs: Keep ADAS Records Ready for DOT Checks
A fleet auto glass program combines mobile repairs, ADAS calibration, and records that support 49 CFR 393.60 compliance and limit fleet downtime....

October 15, 2026
Auto Glass Claims: Choose a U.S. Shop Before ADAS Billing Surprises
See how U.S. drivers can choose an auto glass shop for an insurance claim, confirm ADAS calibration, protect their rights, and prevent billing...
October 14, 2026
Fleet Windshield Maintenance: A 20 Minute Repair Can Prevent Days Down
Catch chips early, log the VIN and photos, and require part number and ADAS calibration records to keep fleet vehicles moving and avoid...