Auto Glass Repair
Calibration failures usually trace back to a small set of fixable problems: glass mismatch, camera or bracket misalignment, contamination, or a setup error in the static or dynamic procedure. The fix almost always starts the same way. Contact the installer, request a documented diagnostic re-check, and ask whether the vehicle’s VIN requires dealer-only work. Until that happens, do not assume your driver-assist features are safe. A camera can pass its electrical check while still pointing in the wrong direction.
TL;DR:
- Proper calibration depends on matching glass specifications, correct hardware positioning, and avoiding contamination during installation.
- Using the VIN, shops must determine whether static, dynamic, or dual calibration is required to ensure proper system alignment.
- Calibration costs typically range from $150 to $500 and take about 30 to 90 minutes, depending on the method and vehicle requirements.
- Repeated failures often stem from unresolved hardware issues, emphasizing the importance of clear documentation and correct setup before re-attempting calibration.
- Choosing a shop that performs in-house dual calibration and provides detailed verification reports reduces scheduling delays and improves safety reliability.
Table of Contents
- What Causes a Failed Windshield Calibration?
- Static, Dynamic, and Dual Calibration: What’s the Difference?
- What Should You Do if Calibration Failed After Windshield Replacement?
- How Long Does Calibration Take, and What Does It Cost?
- How to Prevent a Failed Calibration Before Your Windshield Is Even Replaced
- How Collision Auto Glass & Calibration Handles a Failed Calibration
- What the Industry Gets Wrong About Calibration Failures
- Ready to Get Your Calibration Rechecked?
- Sources
- FAQ
What Causes a Failed Windshield Calibration?
Most calibration failures come down to five categories, and a competent shop should be able to tell you which one applies to your vehicle within minutes of running diagnostics. Common failure causes include mismatched glass, camera or bracket positioning problems, an obstructed camera view, and setup errors in the static or dynamic workspace.
- Glass mismatch. Aftermarket glass with the wrong curvature, a missing camera window, or the wrong tint band can throw off the camera’s optical path even when the windshield looks correct to the eye.
- Camera or bracket misposition. A loose mirror housing, a bracket seated a few millimeters off, or a camera reinstalled at the wrong angle will block calibration outright or, worse, let it complete incorrectly.
- Contamination. Adhesive residue, fingerprints, a leftover protective film, or condensation in the camera’s field of view are common and easy to miss during a rushed install.
- Pre-existing diagnostic codes. Unrelated fault codes already stored in the vehicle’s system can block a calibration attempt before it starts.
- Setup errors. Static calibration depends on exact target distance, angle, and a level floor. Dynamic calibration depends on traffic conditions, consistent speed, and clear lane markings, any of which can derail a road-based attempt.
Technicians typically work through this list in order, starting with the glass and camera hardware before touching the calibration environment itself.
Static, Dynamic, and Dual Calibration: What’s the Difference?
Your vehicle’s manufacturer, not the shop, decides which calibration method applies, and that decision is tied to the VIN. Getting the method wrong, or skipping half of a required dual procedure, is one of the quieter reasons calibration fails to hold.
- Static calibration happens indoors using printed target boards set at exact distances and angles from the vehicle. It requires a level floor and enough clear space, and it’s verified against the manufacturer’s tolerances before the shop signs off.
- Dynamic calibration happens on the road. The vehicle “learns” its camera alignment by driving at specified speeds while reading clear lane markings, which is why heavy traffic, poor weather, or faded striping can cause the process to time out or fail partway through.
- Dual calibration requires both steps in sequence. Skipping the second half leaves the system electrically active but not fully verified, which is exactly the kind of gap that produces a passing scan and a misaligned camera at the same time.
Shops with in-house calibration capability that covers both static and dynamic procedures avoid the scheduling delays that come from outsourcing half the job.
What Should You Do if Calibration Failed After Windshield Replacement?
- Get the diagnostic report. Ask the shop for the actual scan output and any fault codes, not just a verbal “it didn’t take.” Write down any dashboard warning lights or messages you’ve seen since the replacement.
- Ask for proof of the glass spec. A reputable shop can show you the part number and confirm it matches your VIN’s camera window and coating requirements.
- Ask to see the calibration attempt itself. Photos of target placement for a static job, or notes from a dynamic road test, tell you whether the failure was a setup problem or a hardware problem.
- Confirm the re-attempt policy. Reputable shops re-check and re-attempt calibration at no extra charge when the first attempt fails due to their process, and they should say so in writing.
- Ask about dealer routing. If your VIN requires a procedure the shop can’t perform, they should tell you and coordinate the referral rather than leaving you to figure it out.
Pro Tip: Before driving off, ask the technician to walk you through a short test route that mimics a recommended post-calibration verification drive of the first several miles. If lane departure warnings or automatic braking behave inconsistently, go back immediately rather than waiting for a “check engine soon” moment.
If a shop can’t produce documentation or seems unclear about the VIN-specific requirement, that’s worth treating as a red flag, not a formality.
How Long Does Calibration Take, and What Does It Cost?
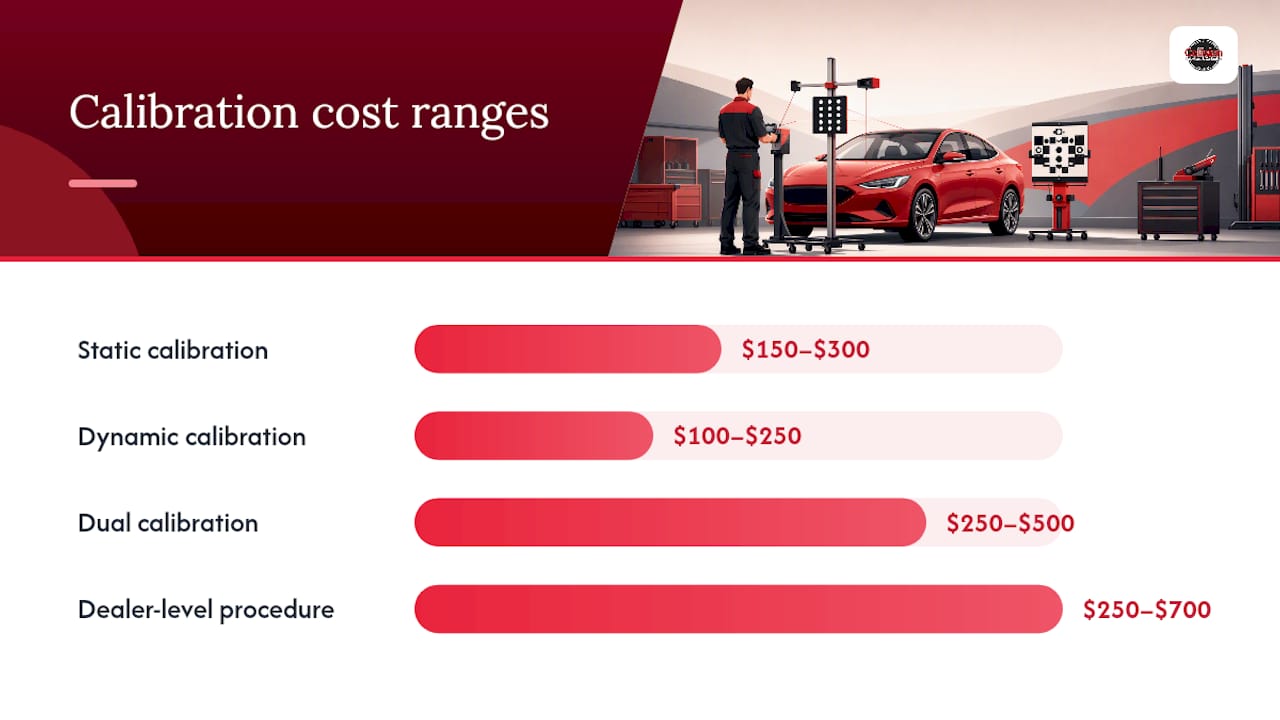
By the numbers: ADAS recalibration after a windshield replacement typically runs $150 to $500 and takes 30 to 90 minutes, depending on whether the vehicle needs static, dynamic, or dual calibration.
Static calibration alone commonly falls in the $150 to $300 range, since it requires dedicated target equipment and floor space. Dynamic calibration tends to run $100 to $250, largely dependent on the length of the required drive cycle. Dual calibration, which some newer vehicles require, typically lands between $250 and $500 because it combines both procedures.
Pricing also varies by make and model. Some vehicles run closer to $250 to $700 when the manufacturer requires a more involved dealer-level procedure. Not every shop owns static target equipment, which is why some jobs get split between a glass installer and a dealer service center. Whoever performs the work, ask for a written post-calibration verification report. Insurance companies and warranty programs both tend to want it on file.
How to Prevent a Failed Calibration Before Your Windshield Is Even Replaced
A few minutes of verification before the glass comes out saves a second appointment later.
- Confirm the replacement glass matches OEM specifications, including the camera window, tint band, and any heating element the original had.
- Ask the shop to inspect and photograph the bracket and mirror housing before the old glass is removed, so there’s a record of correct seating.
- Verify the shop actually owns static and dynamic calibration equipment rather than subcontracting one half of a dual procedure.
- Confirm your insurance covers calibration as part of the claim, and get the shop’s re-attempt and warranty terms in writing before work starts.
Fleet operators managing multiple vehicles face the same risk at scale, and it’s worth understanding how onboard camera systems behind the windshield actually function before authorizing a bulk glass replacement across a fleet.
How Collision Auto Glass & Calibration Handles a Failed Calibration
Collision Auto Glass & Calibration runs both static and dynamic calibration in-house, which means a dual procedure doesn’t require sending your car to a second location. Same-day service and free mobile installation within the Portland area apply to most replacement jobs, and every installation carries a lifetime no-leak guarantee.
When a calibration doesn’t take on the first attempt, the shop rechecks the glass spec, camera seating, and target setup before re-running the procedure at no added cost. Every completed calibration comes with a documented verification report matching the manufacturer’s VIN-specified method, which insurance adjusters and warranty reviewers can reference directly. Direct insurance billing removes another layer of friction for owners already dealing with a repair.
What the Industry Gets Wrong About Calibration Failures
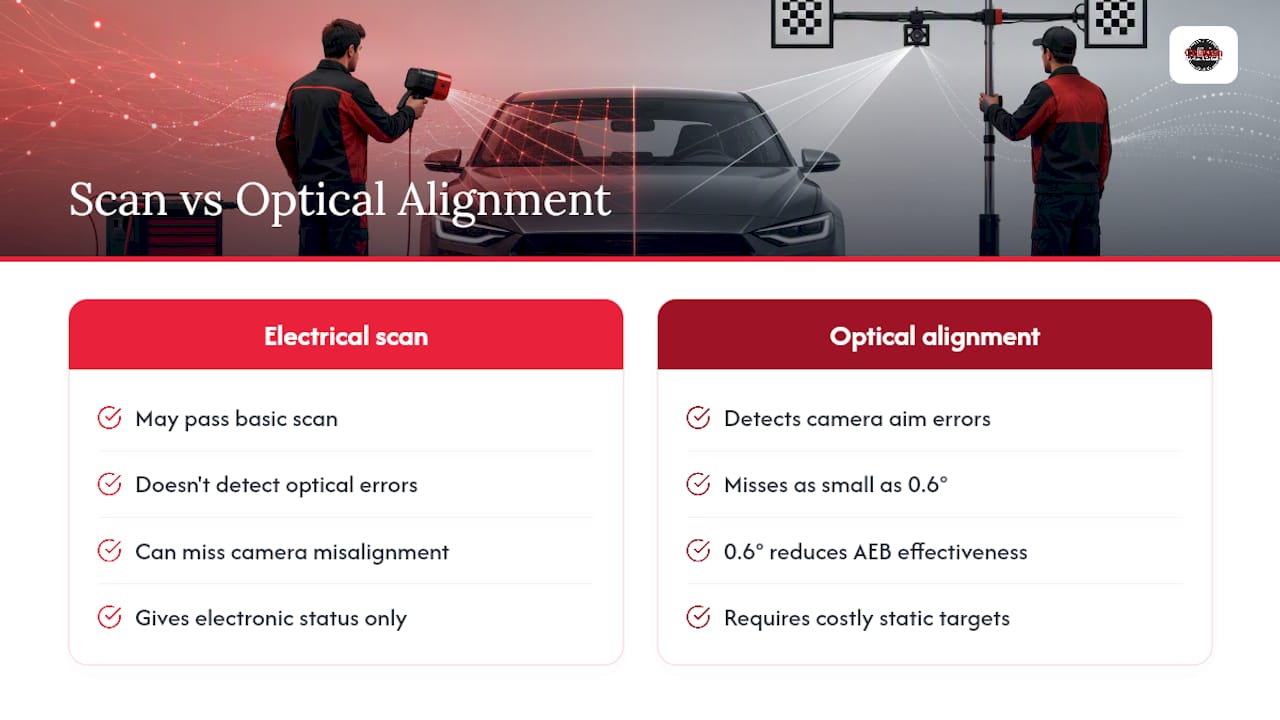
Most advice about failed calibration treats it as a rare glitch. It isn’t. It’s a predictable outcome of a process with several tight tolerances, run in shops that vary wildly in equipment and training. A camera misaligned by as little as 0.6 degrees can significantly reduce automatic emergency braking effectiveness, yet that same camera can pass a basic electrical scan without anyone catching the optical error.
The conventional fix, “just take it back and try again,” is fine as far as it goes, but it skips the harder question: why did it fail the first time? A shop that can’t answer that clearly, with documentation rather than a shrug, probably shouldn’t be trusted with the second attempt either. Full static target setups cost equipment-heavy shops tens of thousands of dollars to install, which is exactly why some providers quietly skip or shortcut the harder half of a dual procedure.
What matters most isn’t the price you paid or how fast the job got done. It’s whether the shop can prove, in writing, that your camera sees the road the way the manufacturer intended. Prioritize documentation over speed, every time.
— Collision Auto Glass & Calibration
Ready to Get Your Calibration Rechecked?
Collision Auto Glass & Calibration is the option for drivers who want a failed calibration fixed without bouncing between a glass shop and a dealer. Because static and dynamic calibration both happen in-house, a dual procedure gets handled in one visit instead of a scheduling relay between two locations.
If your windshield calibration failed, bring your VIN, the original shop’s diagnostic notes, any dashboard warning messages you’ve seen, and your insurance claim number if one exists. The shop will run a diagnostic scan, identify what caused the failure, and re-attempt calibration with a documented verification report you can hand to your insurer. Same-day appointments and free mobile installation are available within the Portland area, and every job carries a lifetime no-leak guarantee. Head to the auto glass repair page to schedule a re-check or get a quote today.
Sources
- Cost for safety systems recalibration after windshield replacement (Car Talk)
- ADAS windshield calibration after replacement (Colfax Glass)
- Top Reasons Windshields Fail ADAS Calibration (Kosins Glass)
- ADAS windshield replacement gone wrong — here is why (Famous Auto Glass)
FAQ
What happens if you don’t calibrate after a windshield replacement?
Your ADAS may operate electrically while being optically misaligned, a “silent failure” that can produce incorrect warnings or unsafe braking behavior without triggering a dashboard alert.
How long does recalibration take after a windshield replacement?
Most recalibrations take 30 to 90 minutes, depending on whether the vehicle needs static, dynamic, or dual calibration.
How much does it cost to recalibrate after a windshield replacement?
Typical costs range from $150 to $500, with some vehicles running higher when a dealer-level dual procedure is required.
How do I recalibrate my windshield sensor?
You don’t do it yourself. A shop with the right static targets and dynamic drive protocol, like Collision Auto Glass & Calibration, follows your vehicle’s VIN-specified procedure and confirms the result with a verification report.
Can a calibration fail more than once?
Yes, especially if the underlying cause (glass mismatch, bracket seating, or contamination) wasn’t fully corrected before the re-attempt. A shop should recheck those factors, not just rerun the same procedure.
Recommended
- Calibration After Windshield Replacement: What You Must Know
- Need a New Windshield? Don’t Forget Calibration
- Windshield Camera Calibration: Portland’s 2025 Guide
- Do I Need To Recalibrate My ADAS If I Replace My Windshield?
🎧 Listen to This Article

Share
Recent Posts
October 15, 2026
Auto Glass Claims: Choose a U.S. Shop Before ADAS Billing Surprises
See how U.S. drivers can choose an auto glass shop for an insurance claim, confirm ADAS calibration, protect their rights, and prevent billing...
October 14, 2026
Fleet Windshield Maintenance: A 20 Minute Repair Can Prevent Days Down
Catch chips early, log the VIN and photos, and require part number and ADAS calibration records to keep fleet vehicles moving and avoid...
October 13, 2026
Calibration After Collision Repair: Ask for Scans Before You Drive
Learn when collision repairs require ADAS calibration, how shops verify the work, and which scan records and paperwork to request before driving....